Automated" email response to the applicant who sent their Comments OR Resume into our Job Site email address
1. Create a list with Name, Email, column
2. Open Sharepoint Designer to the site where list exists.
3. Create a New workflow from File->New->workflow.
4. Give the workflow a name
5. Decide if you want the workflow to Manually, Automatically, or whenever an item is changed.
My suggestion is "Manually" while in development at the minimum. This will keep you from having to continuously upload new documents to test the workflow. You can upload one "test document" and keep using it, by manually starting the workflow on that document.
If you want "Automatic" starting of the workflow, turn that on after you are done testing/building, if you'd like, but if you are building this workflow on an "already existing" document library, you don't want your workflow to inadvertently run while you are building it, should someone put a file in the folder.
Be careful of the "Automatically Start....an item has changed" option, as this has some unintended consequences, which I will explain in a subsequent blog entry

6. Hit the "Next Button" (Bottom Right)
7. Give the this step a name, like "Automated Email Response"
8. The next thing that we need to do is to setup the "Conditions" and the "Actions"
1. Create a list with Name, Email, column
2. Open Sharepoint Designer to the site where list exists.
3. Create a New workflow from File->New->workflow.
4. Give the workflow a name
5. Decide if you want the workflow to Manually, Automatically, or whenever an item is changed.
My suggestion is "Manually" while in development at the minimum. This will keep you from having to continuously upload new documents to test the workflow. You can upload one "test document" and keep using it, by manually starting the workflow on that document.
If you want "Automatic" starting of the workflow, turn that on after you are done testing/building, if you'd like, but if you are building this workflow on an "already existing" document library, you don't want your workflow to inadvertently run while you are building it, should someone put a file in the folder.
Be careful of the "Automatically Start....an item has changed" option, as this has some unintended consequences, which I will explain in a subsequent blog entry

6. Hit the "Next Button" (Bottom Right)
7. Give the this step a name, like "Automated Email Response"
8. The next thing that we need to do is to setup the "Conditions" and the "Actions"

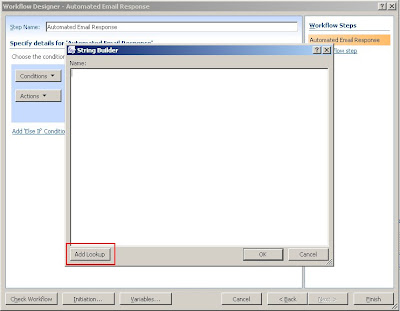
11. Click on the "dynamic string" link and recombine (concatenate) the email address back into one string, which will be stored in the workflow variable that you created ("EmailAddress" in my case). When you click on it, you get a "String Builder" form like this one:

12.Hit the "Add Lookup" button (Bottom Left)


12.Hit the "Add Lookup" button (Bottom Left)

13. When you hit the "Add Lookup" button, you get the "Define Workflow Lookup" form
Select "Current Item" as the source, which refers to the SharePoint list that the workflow is attached.

Select "Current Item" as the source, which refers to the SharePoint list that the workflow is attached.

16. Select the this message link
17. Now you should have the "Define E-Mail Message" form open
18.Hit the "Address book" button on the "To" line. BTW, if you wanted to hard code an email address, just type in in here and skip the next step.
19. Now, in the "Select Users" box, you can either select an:
17. Now you should have the "Define E-Mail Message" form open
18.Hit the "Address book" button on the "To" line. BTW, if you wanted to hard code an email address, just type in in here and skip the next step.
19. Now, in the "Select Users" box, you can either select an:
20.In our case, we are going to use the the "Workflow lookup" option to select our user from the Workflow variable "EmailAddress" that we defined above.
21. Select "Workflow Lookup" and then hit the "Add >>" button (on the right) and your screen will now look like this:
22. Select "Workflow Data" as the "Source". This will allow us to select the field that we built using the Build Dynamic String action (earlier). Now, select the "Variable: EmailAddress" and hit the OK button to close the "Define Workflow Lookup"
24. If you want, you can Log the action, by using the "Log to Workflow history action" and enter a simple message, like "Send automated email response."
25. Click the "Check Workflow" button (button left), to make sure that you've made no mistakes.Click the "Finish Button" (bottom right) to have the workflow attached to your SharePoint list
26. Go back to your SharePoint Site and to your SharePoint List click on new add the values and give your email Id in the email field if u have created...


Comments