Creating your own Content Type with Visual Studio 2010
We are going to see how to deploy our own Content Type for Sharepoint 2010. This approach is quite straight forward to be honest. We could build something similar programmatically but for now let’s go to concentrate how to develop a flexible solution.
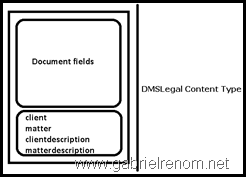
I am going to develop a Content Type called DMSLegal, it will be based in a legal document management system, so considering that it should inherit the document fields plus client, matter, client description and matter description. To simplify the operation, all of them should be text columns.
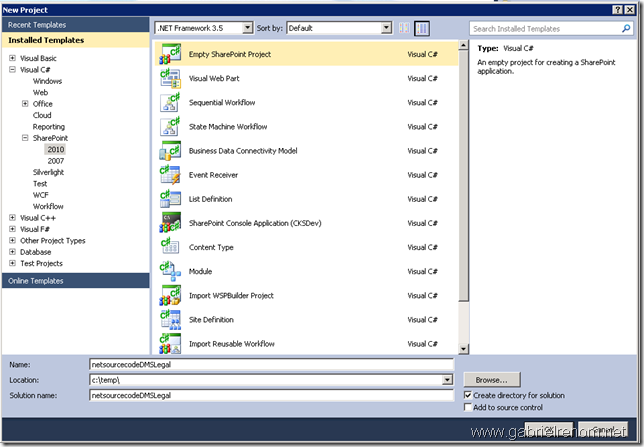
Let’s go to start. First of all create an Empty Project, so go to Visual Studio 2010->New Project->Sharepoint->2010-> Empty Project and in the name of the folder type netsourcecodeDMSLegal.
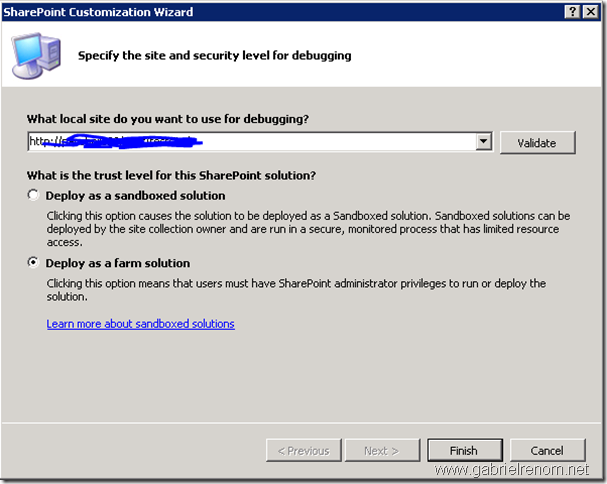
Click on OK. Now select Deploy as Farm Solution and click Finish.
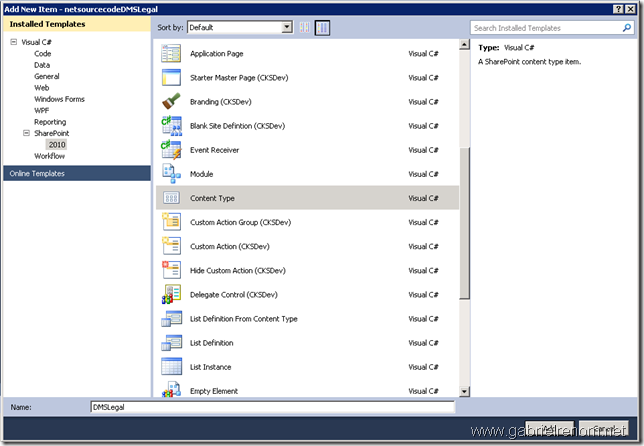
Go to your project Right Click-> Add->New Item->Content Type and in the name box type DMSLegal, click Add.
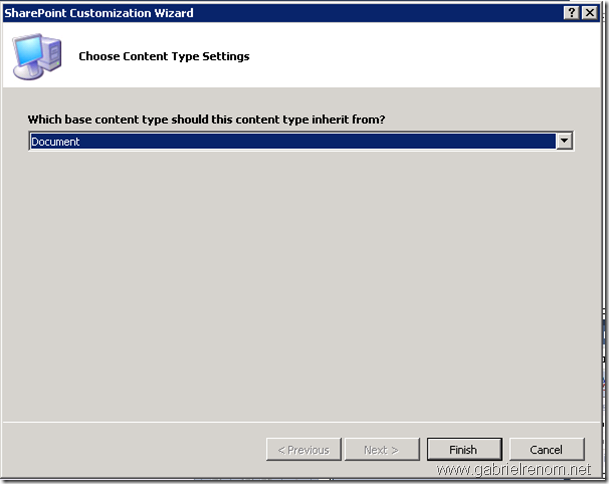
The next step will be selecting the Content Type where we want to inherit the fields. We don’t need to, we could just select Item(the most basic one) , but it will be faster so select Document, so we can avoid creating fields, at the end of the day a legal document it is a document with a client/matter tag. So select Document and click finish.
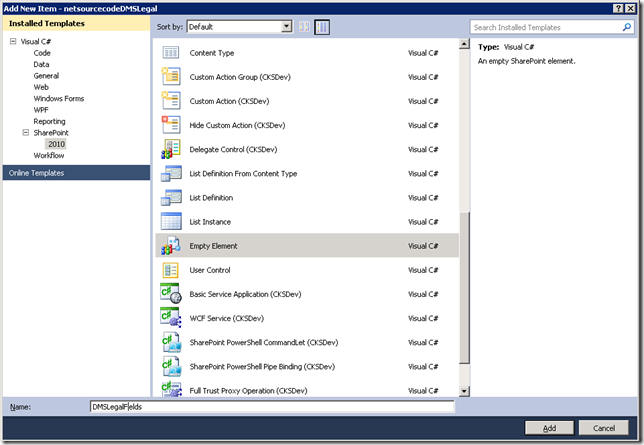
Let’s go to rename the Feature, so we can have something more comprehensive. Rename to DMSLegalCTFeature. After that go to your project and right click->Add-> New Item->Empty Element and call it DMSLegalFields and click on Add.
We have to define our fields in Elements.xml of the DMSLegalFields. The GUIDs can be crated with the Create GUID tool from Visual Studio 2010. Just go to Tools->Create GUID. This is how the Element.xml should look like.
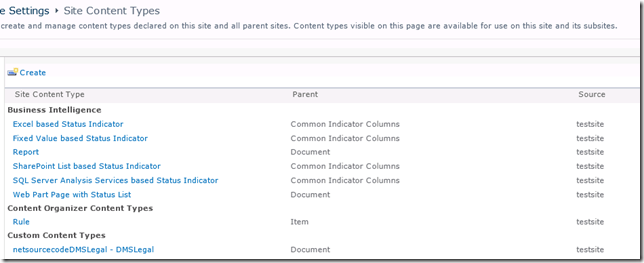
F5 and go to Site actions->Site Settings->Galleries->Site Content Types and you should have this screen:
We are going to see how to deploy our own Content Type for Sharepoint 2010. This approach is quite straight forward to be honest. We could build something similar programmatically but for now let’s go to concentrate how to develop a flexible solution.
I am going to develop a Content Type called DMSLegal, it will be based in a legal document management system, so considering that it should inherit the document fields plus client, matter, client description and matter description. To simplify the operation, all of them should be text columns.
Let’s go to start. First of all create an Empty Project, so go to Visual Studio 2010->New Project->Sharepoint->2010-> Empty Project and in the name of the folder type netsourcecodeDMSLegal.
Click on OK. Now select Deploy as Farm Solution and click Finish.
Go to your project Right Click-> Add->New Item->Content Type and in the name box type DMSLegal, click Add.
The next step will be selecting the Content Type where we want to inherit the fields. We don’t need to, we could just select Item(the most basic one) , but it will be faster so select Document, so we can avoid creating fields, at the end of the day a legal document it is a document with a client/matter tag. So select Document and click finish.
Let’s go to rename the Feature, so we can have something more comprehensive. Rename to DMSLegalCTFeature. After that go to your project and right click->Add-> New Item->Empty Element and call it DMSLegalFields and click on Add.
We have to define our fields in Elements.xml of the DMSLegalFields. The GUIDs can be crated with the Create GUID tool from Visual Studio 2010. Just go to Tools->Create GUID. This is how the Element.xml should look like.
<?xml version="1.0" encoding="utf-8"?>
<Elements xmlns="http://schemas.microsoft.com/sharepoint/">
  <Field ID="{00F49879-0ECB-4736-A400-256747E1BB09}" Type="Text" Name="client" DisplayName="Client" Required="TRUE" Sealed="TRUE"/>
  <Field ID="{4E7EE8BB-262D-46EA-AAAE-F343005627DF}" Type="Text" Name="clientdescription" DisplayName="Client Description" Required="TRUE" Sealed="TRUE"/>
  <Field ID="{089A1A43-EB01-4EFF-81EE-20F46916B79F}" Type="Text" Name="matter" DisplayName="Matter" Required="TRUE" Sealed="TRUE"/>
  <Field ID="{E2B310DE-22AA-4EC0-8600-2200E5861A66}" Type="Text" Name="matterdescription" DisplayName="Matter Description" Required="TRUE" Sealed="TRUE"/>
</Elements>
Now with to associate the FieldRefs with our new fields, to do that go to the Elements.xml file under DMSLegal and add the fields. Your new Elements.xml should be this one. Notice that the IDs have to match with the GUIDs you created. Have a look to the property and add more if you want… I leave the default values to make it easy.<?xml version="1.0" encoding="utf-8"?>
<Elements xmlns="http://schemas.microsoft.com/sharepoint/">
<!-- Parent ContentType: Document (0x0101) -->
<ContentType ID="0x010100981bf304cdb44d1d9c0d7d794f8410b6"
Name="netsourcecodeDMSLegal - DMSLegal"
Group="Custom Content Types"
Description="DMS Legal Content Types"
Inherits="TRUE"
Version="0">
<FieldRefs>
<FieldRef ID="{00F49879-0ECB-4736-A400-256747E1BB09}" Name="client" Required="TRUE" Hidden="FALSE" ReadOnly="FALSE"/>
<FieldRef ID="{4E7EE8BB-262D-46EA-AAAE-F343005627DF}" Name="clientdescription" Required="TRUE" Hidden="FALSE" ReadOnly="FALSE"/>
<FieldRef ID="{089A1A43-EB01-4EFF-81EE-20F46916B79F}" Name="matter" Required="TRUE" Hidden="FALSE" ReadOnly="FALSE"/>
<FieldRef ID="{E2B310DE-22AA-4EC0-8600-2200E5861A66}" Name="matterdescription" Required="TRUE" Hidden="FALSE" ReadOnly="FALSE"/>
</FieldRefs>
</ContentType>
</Elements>
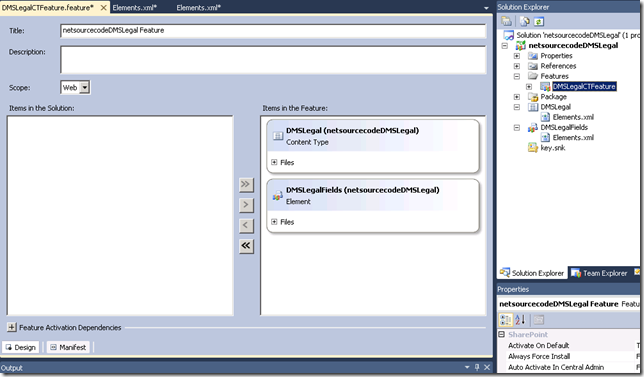
Now go to your DMSLegalCTFeature , double click and change the title to netsourcecodeDMSLegal Feature. Have a look to the structure of the project to see if it matches with yours.
F5 and go to Site actions->Site Settings->Galleries->Site Content Types and you should have this screen:
Comments