The process of setting up your SharePoint 2010 search box step-by-step
1. We need to first start the search service application in Central Admin.
2. Go to Application Management -> Manage service application.


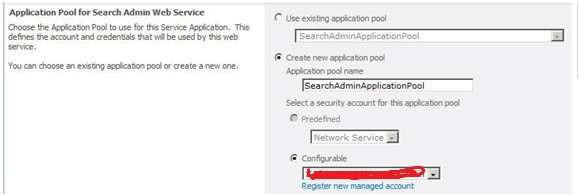
6. Configure application pools for both the “Search Admin Web Service” and the “Search Query and Site Settings Web Service.”


10. Once again, go to Application Management -> Manage service applications.
11. Select “Search Service Application,” then click the “Administrators“ ribbon button to configure the search service for administrators.

12. Select “SearchAdmin.” This is the service account we previously created in the search service application.


1. We need to first start the search service application in Central Admin.
2. Go to Application Management -> Manage service application.
3. Then start a new “Search Service Application.”
4. Provide the application name, in this case “Service Search Application.”


5. Provide a search service account.
7. Click “OK” and wait for SharePoint to process the request. This may take several minutes.
8. A message will then appear if the search service application was successfully created.
10. Once again, go to Application Management -> Manage service applications.
11. Select “Search Service Application,” then click the “Administrators“ ribbon button to configure the search service for administrators.
12. Select “SearchAdmin.” This is the service account we previously created in the search service application.
13. Now to assign the permissions.

14. Almost done, go to Search Service Application -> Content Sources and select “Start all crawls.”
Comments